New Entry way for Halloween & Christmas
by Chris on Sep.16, 2018, under Decorating, Halloween, Main Page
 This yeas big project for Halloween is to rebuild the columns and gate at the front of the yard.
Keep reading if you want want to hear all about how we made these, and all the cool little features we put into them!
The current columns have been problematic for a long time, they have rotted out and needed to be rebuilt three or our times in the last ten or twelve years. I’m hoping to avoid that this time by using heavier plywood and urethane.
I wanted to make these new ones a lot fancier than the old ones, and after looking at a number of faux stone and faux brick options, all of which were either too expensive or would not stand up to the elements all winter, I decided to spend time instead of money and rout “bricks” out of plywood.
I also wanted them to be taller than the old ones for Halloween, but not for Christmas. Which means I needed them to come apart. Finally, I want all the electrical stuff (both for the column lights and also for the yard lights for both Halloween and Christmas) to live inside the columns to keep them all safe, secure, and out of sight.
So here we go!
Step 1: Rout the Bricks
First off I wanted to prove to myself that I could make these look enough like real brick to be passable, since these will be out for Halloween, Christmas and probably early spring as well, until the weather clears up and the indoor archery tournament season is over. So they will be up from September to at least February.
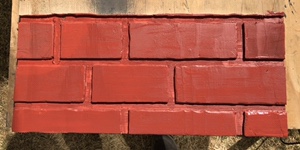
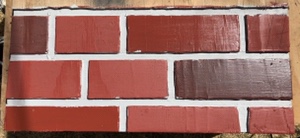
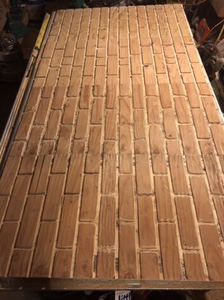
I started by cutting a piece of scrap plywood to the the approximate width of my columns. Then I drew out some rough lines and used the router to make the “grout” lines, about 1/4″ deep.
Then I painted the whole thing in Barn Red Metro Paint. Since bricks usually are a mosaic of colors, I mixed the Barn Red with some black, white and brown paints to produce a few other shades and then hand painted some individual bricks with the different shades. Finally, I painted in the grout with a light gray. I wasn’t too worried about being careful with the gray paint since grout gets on bricks in real life, so I figured my booboos just made it look more realistic.
The photos below show my trial run at routing the bricks and painting them, which turned out well enough. I will do some additional aging with the paint on the final product, but I think this looked pretty good.

After the trial run, it was time to rout the real panels. I wanted my columns to be about 40 inches high, and 18-20 inches wide. I also wanted the corners to work out correctly, so I had to measure my bricks to determine the final size for each faux brick panel. The brick I used as a model was 8 inches long, 2.5 inches high and 4 inches wide. Adding in 1/2″ grout lines, and wanting to use only full size bricks, that came out to 42 inches tall and 20.5 inches wide. (8.5 + 8.5 + 4 = 21, but the plywood is 1/2″ thick and they will overlap on one end, which is why I cut mine to 20.5. I also made sure to lay it out in such a way that the corner bricks alternate lengthwise/widthwise like they would in real life. Amazingly enough, this actually worked out!)
Next I measured it all out and drew lines on the plywood, then I setup a guide for my router and started routing the panels.
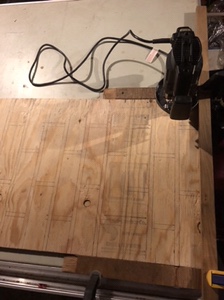
I used the jig to route the 20.5″ horizontal grout lines and freehanded the vertical lines. I also cut a few bricks here and there into smaller bricks, since most really old brickwork had some small pieces fitted in here and there. I wasn’t especially careful with getting the lines perfectly straight. I wanted my bricks to look old and battered so I a spent a lot of time taking nicks out of the flat surfaces, rounding over corners, grinding away sections to look like they were broken, and roughing up the surface. That made any routing “mistakes” look a like plan. That is the best part about working on Halloween stuff… when you mess it up, it just looks better.
I wound up ordering some carbide metal grinding bits for the Dremel, which really worked well for the aging/roughing up process. Here are the first four panels all routed and aged. I would do 16 panels in all.
Finally, mom painted all sides with two coats of primer. We did this because of the issues I’ve had with other versions of these columns rotting over time. Since I’m putting a lot more time into these ones, I want them to last and I think that priming and sealing the wood all around before I assemble it will help.
Step 2: Build the frame and attach the brick panels
This is far easier than routing the bricks, but it was pretty time consuming since we made the decision to put two coats of primer on everything before we built it, inside and out. That really slowed things down, especially when it rained on Saturday instead of being 85 degrees.
The frames were really simple, 2×2 frames. The bottom one was 41.5″ tall so that the top piece of plywood would finish it off to 42″. They needed to be 20″ wide so that the plywood will overlap .5″ on one side and make everything line up.
The top piece I mentioned will eventually have holes drilled in it with T-nuts so I can attach everything together, both the top brick pieces for Halloween as well as the bird statues for Halloween, the trees for Christmas and the lanterns for the rest of the Spring.

The brick panels attached easily and were screwed on with 1.25″ drywall screws.
After all the sides were attached, I routed down the edges of the overlaps so that everything was flush, and I rounded out the corners a little with the Dremel to make them match with the rest of the weathering on the bricks.
My plan has been to have electrical outlets in these columns so that the plugs for all the lights in the lower yard are inside these columns, safe and secure from the elements. To accommodate that, as well as assembly and disassembly of the top portions, I cut doors into the back panels of all four sections. This will also allow us to store all of the accoutrements inside the columns, which will help when it comes to storing everything over the spring and summer.

After the top and bottom sections were built, I stood them on top of each other, aligned the outer edges and then drilled holes down through the floor of the top section and the top of the bottom pillar. I then glued 1/4″ T-nuts into the top section. That allowed me to secure the top to the bottom via the 1″ long 1/4″ hex head bolts. It is very well secured with a bolt in each corner!
Finally, I drilled a 2″ hole through the center of the floor/ceiling of the two columns. This hole will accommodate the wiring from the lanterns on the front of the upper portion of the columns (Halloween) as well as the wiring for the Christmas trees and lanterns later in the year.
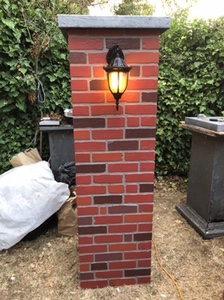
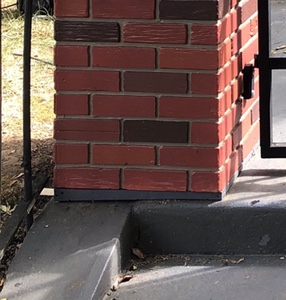
Here’s a picture of the full-size, six foot column:
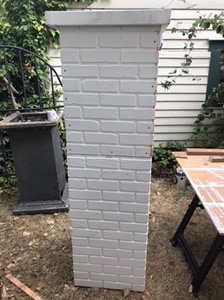
You can see the seam between the two halves on this one more than I like. I messed up my measuring some how so the top 1/2″ plywood cap does not quite sit flush on the bottom pillar. It’s sort of a bummer, but I’m going to make faux stone signs which will cover that up, so it shouldn’t be too noticeable when everything is finished.
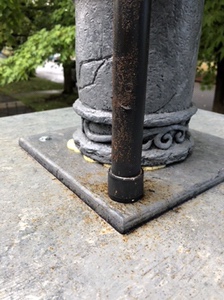
Step 3: The Stone Cap
I needed something to go on the top of the column to make it look finished. I could have gone with either a faux brick top by routing lines in it like I did the side panels, but I decided I preferred the look of a faux stone cap. I built this out 2×3 stood on end, and I made it about .5″ bigger all around than the column, so it would easy slip down over the top even if the wood swelled with moisture.
The old columns had a very similar top piece, and with those I just screwed down a piece of plywood on the top. That worked well, but even with sanding and painting I could still always see the edge of the plywood, so this time around I routed out about 1/2″ deep by 1/2″ wide channel on the inside of the 2x3s and recessed the plywood cap so that you cannot see it when you look at it from the front sidewalk.
I also needed this cap to be swappable depending on how tall I had these columns. For Halloween the cap will be on the top, and then when we shorten them for Christmas the cap will move down and be mounted to the bottom portion.
The last complication for this cap is that it will have three different things that mount to it: For Halloween it will have the raven statues, for Christmas it will have lighted Christmas trees, and for the rest of the time it will have lanterns. Because of that I decided to have the cap and the various other bits be held down with four common bolts.
Each topper was attached to a 10″ square piece of plywood, which had holes drilled in the corners. I drilled all the pieces together, along with the cap piece and the top piece of plywood on the bottom column piece, so that all the holes alligned perfectly. Then I mounted T-nuts in top of column. I used more 1/4″ bolts (2.5″ long) to tighten everything down. This holds both the birds/trees/lanterns securely to the “stone cap” and also securely holds the cap to the top of the pillar.
I painted them using the same technique we do for painting tombstones, which can be found here.
Step 4: Painting
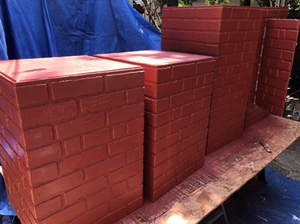
The real trick to making things look right is a good coat of paint… or several good coats of paint. For this project I used some Barn Red paint I had left over from a 2016 Halloween project, which I got at Metro Paint in Portland. It’s super cheap, and the Barn Red was a great brick color. I sprayed both columns with 3 coats of red to make sure we got a good cover over the white primer.
Then we mixed some of the red with black, gray, brown and orange (also left overs) to make some slightly different shades. Then we painted a few of the bricks on each side with these different colors to imitate the look of old brick construction.

I spent a lot of time over the last couple of weeks looking at brick buildings and walls to get inspiration, and it seems like old brick mortar is usually sort of a sandy-gray-brown. We tried to mix up our own using the paints that we had and we got a pretty good color, but we didn’t have enough to do both columns, so I went down to Miller paint and found a very similar shade which they sold me a quart of for $5.38. Score.
After that Maure and Shannon painted all of the grout lines. We didn’t worry too much about being super carful, since mortar does wind up getting on bricks, or if the edges were a little uneven I thought it just lended to the weathered look. Mom’s OCD got the better of her, though, and she went back over many of the bricks and cleaned some stuff up a little bit.
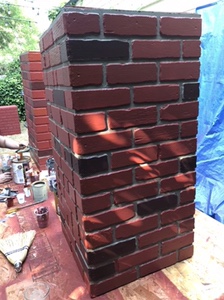
After the paint was dry, I applied a very thin layer of dark gray paint, mixed 50/50 with water to add some aging. The idea was to just make them a little little older and dirtier, not like they were just built the day before.
And finally I covered the whole thing in 4-5 coats of spar varnish to help protect it from the elements. I covered the bottom with extra coats, and will probably reapply to the bottoms and the stone caps every summer, since those are the parts that get the most water on them.
Unfortunately the urethane sort of washed off some of the aging coat, so they wound up looking pretty new again. Oh well. The aging will have to happen naturally.
Step 5: Lanterns
I drilled a hole for the wiring to pass through the front of the column and wired that to the end of an extension cord which had been decapitated in a horrific lawn mower accident. That cord runs through the hole in the “Floor” of the upper column section and down to the bottom column, where I have mounted a powerstrip.
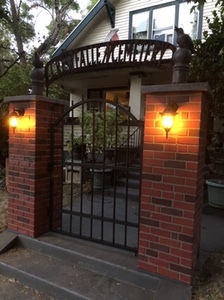
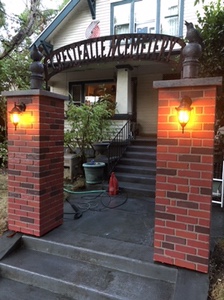
I think they turned out really awesome! A definite improvement over the old ones, which you can see the remains of in the background in the picture above.
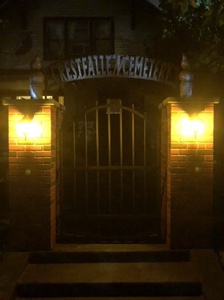
Here is a picture how both columns look in the dark!
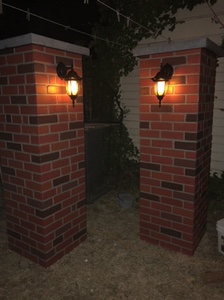
I think those are hard to beat! Although I’m still very surprised how long it took to get this far.
Step 6: Electric
In the past all of the yard lights have been plugged into power stakes in the ground next to the columns, and extension cords ran to and from them. To keep them safe from the elements we covered them with plastic buckets, which in turn were covered in black plastic.
I decided early on that I wanted to move all of that stuff inside these columns this year. It will keep the plugs safer from the elements and more hidden from view.
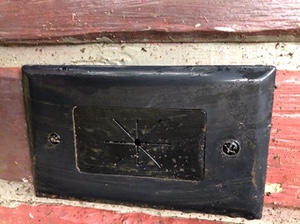
The first step in that process was to buy these AC power ports. I drilled the holes in the back corners of the columns next to the grass, where an extension cord will supply power to the columns.

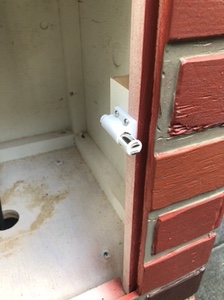
On the inside I mounted a power strip inside each column and secured it to the bottom with plumbers tape.
I also added these passthroughs in the back corners on the grass-side, so I could bring the various extension cords from the yard inside the columns where they will be safe and sound from the weather.
Step 7: Finishing touches
Mom came up with a fantastic idea of using magnetic push catches on the doors, which worked out awesome! On the outside they sit flush, and they open and close super easily.
Mom also came up with the idea of installing leveling feet in the corners, so we can easily get them level (the front walk way is not level any more… welcome to old houses), and also will keep them just a tad off the ground so they aren’t soaking all winter/spring. That should help keep them from rotting out like the olds ones did.
This wound up raising them off the ground quite a bit, so I had to cut some 2×4’s and fill in the space under them so they didn’t appear to float. I painted the 2×4’s to match the sidewalk paint so it just looks like we poured a bit of concrete to level out the walkway before we built the columns. Since these are what will be in contact with the ground, this little frame is likely the only part that will be water damaged and should be very easy to replace if we need to.
Step 8: The Sign
Another feature I decided I wanted when I dreamed up this new entryway was an old, rusted cemetery sign. Now that the columns are pretty much done, its time to start working on the sign.
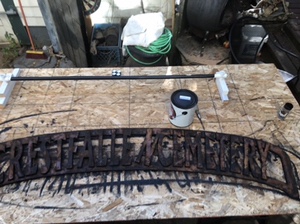
I measured the distance between the columns where I was going to attach the sign, and then used Illustrator to design the whole thing to scale. I had to monkey around with the letter spacing and letter height in order to get the letters to fit the arch, stretching the letters to be much taller than they were originally. But I think they still looked cool. I then tile-printed it and taped the various pieces of paper together so I had a guide to follow with the jigsaw.

Next I printed the lettering. After I had it laid out pretty much the same way as the frame, I cut out the individual letters and taped them onto scrap pieces of plywood left over from earlier parts of the project (I had MANY to chose from). Most of these little pieces were too small to be much good for anything else, so it worked out well.
I used the jigsaw to cut out each letter. I had considered doing the letters out of 1″ foam, but in the end I decided that plywood would be stronger and less likely to get damaged while it was being stored for the offseason.
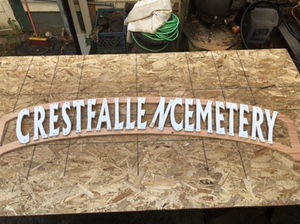
After I had all the letters cut out, I attached them to the arch with gorilla glue and round-topped screws. I thought the round-top screws might look like bolts or rivets when it was done and rust-painted, but they are pretty small so I’m not sure if they will show or not.
Finally, since this is Crestfallen Manor, I figured the sign should be a little… well… crestfallen. So I made it look like the N had come loose and fallen over against the C. I considered having the Y at the end fall all the way over and hang upside down, but I thought it would be too easily broken, so I went with the loose N. I think it looked pretty good.
The weather didn’t corporate at all and it rained all afternoon, so I had to delay the painting until the next day. I was bummed because I was really excited to see how the rust paint worked out.
When we were able to use it, the Rust Dust was awesome. It seems to be iron filings which you sprinkle on the prop while the paint is still wet, and then when the paint has dried, you squirt the activator on the metal filings and about an hour later it has oxidized and made real rust on the prop. In addition to giving it the correct color, it also provides a fantastic texture. I wound up using the whole bottle of Rust Dust on the front of the sign, and had to order more for the back. But I think it wound up looking great!

Attaching it to the columns was pretty easy. I cut a couple of pieces of 3/4″ PVC and bolted the top to the sides of the frame. We also Rust Dusted the PVC so they looked like old, rusted iron pipes.
To secure them to the tops of the columns, I drilled a hole through the bottom of a PVC cap and then used one of the bolts that fastens the bird statues to the top of the column to secure it. So it was doing double duty: holding the PVC cap to the top of the column, and holding the birds/capstone to the top of the column also.
I was hoping that the lights on the front of the column and/or the street lights would throw enough light that you could see the cemetery sign at night, but you really could not. Since we had put so much work into it, I wanted it to be seen, so I used this idea to make some LED spotlights which I mounted on top of each column using a small piece of aluminum flat bar. I think they did a great job!
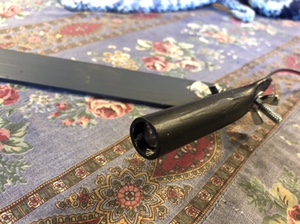
The lights are really simple. The LED is a 10mm, 12v LED from Lighthouse LEDs. I think they are about .39 cents each. The housing is a 3.5″ piece of CPVC. I heated the back end with the heat gun and then squished it in the vice to close it and make it flat. Then you drill a couple of holes in it to let the LED wires out and to mount a bracket to it, paint it black, and boom! You have a sweet little LED spotlight.
The wires slid under the mounting plate for the raven statues and down through the center hole just like I had planned for the Christmas trees.
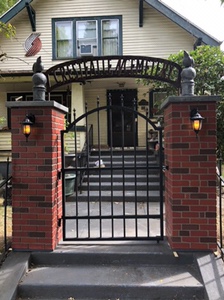
Step 9: The Gate
Now that we had a columns and the sign done, the last thing I needed to finish this project was new gate. I liked the design of our old one, but it was made entirely out of PVC and it just too wiggly and rickety, especially for Christmas time.
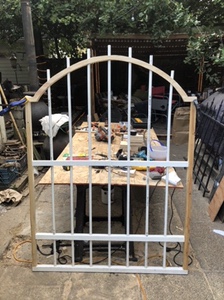
I made the new gate with a 2×2 frame, and used 1/2″ PVC pipe for the bars just like we did on the fence. I wanted the top to be arched, so I laminated two pieces of 3/4″ plywood together so it would be the same width as the 2×2’s. I then drew out the pattern in Illustrator and printed it like I had for the sign.

I wanted the PVC to pass through the top arch and have finials on top like the fence does, so I knew that I was going to have to drill holes through the arch. I thought that would be difficult to do after on a curved surface so I initially cut the top arch in a stair-step pattern so that there was a flat surface to drill through with the drill press. After the holes were drilled, I then cut the arch out with the jigsaw.
Unfortunately the blade really bowed badly while I was cutting it, so the cuts were angled quite sharply. I did my best to clean it up on the belt sander, but it didn’t quite come out as clean and perfect as I had imagined in my head. Still, I think it looks pretty darn good, and after it was painted it was harder to see the imperfections.
I had already decided on strap hinges, so I knew it would need two, 2×2 cross bars, both to give the PVC bars some rigidity and also to attach the hinges to.
Since I’m planning on the pillars being shorter for Christmas, the gate had to attach only to the bottom portion. I had drawn the whole entrance out in Illustrator, so I was able to use that to figure where to place the hinges so that they would be under the capstone when the columns were shorter, which worked out great! Or at least I think it did… we’ll see for sure when we transition from Halloween to Christmas in a couple months.

After that I just sprayed the whole thing with a few coats of black paint, and then mounted the hardware on the sides of the columns. The hinges are just simple pins that the straps on the back of the gate slide down over. I had to mount them to a piece of 1×2 to get the hinge a little bit off the side of the columns, so that when the gate is opened fully it does not bump into the 2×3 lip on the capstone.
Just like the old gate, I installed a wheel on the far side to help support the weight. It’s pretty big, around 54″ inches across, and is surprisingly heavy. Without the wheel the gate wanted to sag. The wheel keeps it from sagging and makes it open and close very smoothly.
I used a simple gate latch to lock it, which accomplished two goals: it locked the gate, and it also prevents people from opening the gate outward so it swings over the stairs.
The final touch was to put the finials on the top of the PVC. I bought some more of the same plastic finals I had on the fence. They are made for 3/4″ fencing, which is just a bit too small to fit over the outside of a 1/2″ PVC pipe. To get them on, you just hit the finial with the heat gun for few seconds to soften up the plastic, then force it down over the PVC… and viola!
All told this project took about 6 weeks cost around $500 dollars. It was not at all cheap, but it was about half what it would have cost if I had made the columns out of actual bricks, stone, or Airstone. And if I had done that, I would not have the storage or the ability to have all the electrical stuff in the yard inside them.
I think they look really great! I can hardly wait to see them with the rest of the Halloween decorations!